As I’ve previously said elsewhere in this blog, I’ve decided that braid useage in hooklengths does not need to be more than a maximum of 6″ long. But braid is not a great material for loops that are intended to fit over quick-change beads or links on swivels as once wet the braid tends to cling together and trying to open out the loop with wet, and sometimes cold fingers, can be a trial of patience and dexterity. And so to rectify this I described using a dual material hooklength – the bottom part (< 6″) to the hook being braid and the upper part to the loop for connection to the mainline being standard monofilament which does not have this tendency to cling and with its natural springiness it provides an easy means to place on your bead or swivel. The two parts being connected with a ‘shridd knot’ as described in my Sept 12th 2013 posting under the title “A Page Of Thoughts And Other Meanderings….” And this works well from my experience….
HOWEVER – I have discovered one case where this dual material creation as it stands does not work so well – and this is when using the technique known as ‘laying-on’ – basically using a float fished overdepth and overshotted (use Google for full details of the method) – when the distance of the lowest shot from the hook can be literally 1″ or less – although more usually 3″-4″ – AND if you wish to thread you bait onto the hook length with a baiting needle – as I do when worm fishing – I use a baiting needle and pull the hooklength through the entire worm’s body from about 1/4″ from the tail to a 1/4″ from the head. OK? See the problem?
That bottom shot resting a few inches from the hook? To thread the bait down to the hook on a standard length hooklink (12″) you’d need, each time you re-baited, to remove all shot from the hooklength – hopefully only that bottom one but possibly more depending on your shot arrangement. Personally I have all my bulk shot around mid-depth with just the one shot on bottom but occasionally I do need to add an additional adjusting shot to counteract water drag and hold the bait still on the bottom. WHAT A PAIN if you had to do that all the time.
Partial solution – very short hooklength – so that the bottom shot is sited ABOVE the connecting item (bead/link) – ie is 6″ or less. Easiest is just a 100% braid hooklength – but then that clingy loop becomes a problem again. But to add a length of monofilament means messing with 2″/3″ lengths of material to connect together/make a connecting look/to tie on the hook… fiddly at the least, impossible at the worst.
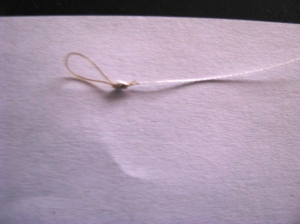
Solution – hooklength is braid BUT the loop is monofilament – and ONLY the loop.
And its relatively easy to do – if you have a Preston type hook tyer…. (also under other names)… but make sure its this TYPE, another type has a body with just 2 pins sticking out that require you to actually tie the knot yourself and the pins act just as a size former.

£1 off eBay, various other prices elsewhere – and this one ties loops of 2 sizes.
Other similar types/names available
Basically the modus operandi of the device normally is shown here: http://www.youtube.com/watch?v=BXJM2xMhSxk….
And to make the mono looped braid hooklength it is just a matter of following these instructions using your intended monofilament for the loop… but AFTER having made the initial loop around your finger, you lie and hold your braid alongside the mono so that the end of the braid reaches the end of the mono loop…. and then just follow the rest of the procedure using both the braid and mono together as if they were a single unit. Then having completed the process you will have a knotted mono loop from which issues 4 lengths of material – the 2 long source/spooled lengths of mono and braid, and the 2 short ‘tag’ ends of both…. and to complete all you have to do now is to cut/trim off, close to the loop, the long mono length and both tag ends leaving you with a mono loop fitted to your braid – and so now just cut the braid slightly longer than your required hooklength to allow for tying on the hook – I generally cut at about 6″-7″ – and then attach hook at required length and trim per usual.


Ok… so in use for laying-on the mainline is fitted with a quick-release bead or simply a small link swivel, above which the shot that lies on the bottom is placed, and the hooklink is just removed/baited/replaced to the bead/swivel with the minimum of fuss.
In fact, I’m switching all my hooklengths over to this short braid-with-mono-loop system – actual length of hook to lead/shot being determined by shot or by leger stop placement on the main line. With such short braid lengths they’re dead easy to store as the loose ends do not generally need to be tethered, can store more too as no need to have several different lengths, plus less prone to tangle (both in storage and in use).

Leave a comment